Showing posts with label Syndicated. Show all posts

Friday, February 10, 2017

How to get Open Live Writer working with Blogger

Wow – I didn’t blog at all in 2016!  While I’m certain that falls squarely on me, perhaps a small part of it is related to a bug connecting to Blogger (formerly Blogspot) blogs in my favorite blogging software – Open Live Writer.  This blog post explains the workaround and how I figured it out.  Hopefully this issue will get patched by the Open Live Writer team and the workaround won’t be needed in the future.

The Issue

Trying to connect to a Google Blogger blog with Open Live Writer v0.6.0.0 doesn’t work (this is the latest version as of this post).  Clicking the Sign In button brings the user to this URL:

https://accounts.google.com/o/oauth2/auth?access_type=offline&response_type=code&client_id=PASTE_YOUR_CLIENT_ID_HERE&redirect_uri=http:%2F%2Flocalhost:59530%2Fauthorize%2F&scope=https:%2F%2Fwww.googleapis.com%2Fauth%2Fblogger%20https:%2F%2Fpicasaweb.google.com%2Fdata
Notice the client_id value “PASTE_YOUR_CLIENT_ID_HERE” in that URL!  That’s definitely not right, and it breaks the attempt to authenticate to Google via OAuth.

The Workaround

I tried installing several different versions of Open Live Writer via Chocolatey.  I found that the issue is also present in versions v0.5.1.4, and v0.5.1.3, but version v0.5.1.2 works.  The best way to get Open Live Writer working with Blogger is to install Chocolatey, and then run this command:

choco install openlivewriter -version 0.5.1.2 -force


That will install the correct version of Open Live Writer that we need to authenticate. However, you can’t run Open Live Writer from the main shortcut. Open Live Writer uses Squirrel which is a tool that assists with automatically updating software when it is launched. Almost all the time this is great, but for our purposes it will not help since we want to run the exact version we’ve just installed.


So run this, and you should be able to authenticate with Google’s Blogger service via OAuth:


%localappdata%\OpenLiveWriter\app-0.5.1.2\OpenLiveWriter.exe


Once you’ve authenticated to Blogger, you can quit out and then use the Start Menu shortcut. This will run the Squirrel updater, and your system will be updated to the latest version which is v0.6.0.0 as of this writing.


How I Figured This Out


It was a bit of brute force. First I cloned the repository for Open Live Writer from here. Then, I opened up the solution in Visual Studio 2015 Community Edition and searched for the string “PASTE_YOUR_CLIENT_ID_HERE” in all files. This led me to the src/managed/OpenLiveWriter.BlogClient/Clients/GoogleBloggerv3Secrets.json file. When I noticed that the file was called “Secrets” it made me think that perhaps this was a compilation/deployment issue. I looked into the .gitignore file at the root of the repo, and sure enough the GoogleBloggerv3Secrets.json file was specifically ignored.


Therefore, my theory was that the person who packaged up Open Live Writer versions v0.6.0.0 didn’t have the Secrets file updated on their machine. This leads to the idea that probably someone in the past DID have it updated, so I tried successive earlier and earlier versions until I hit on v0.5.1.2 working (I would have tried a bisect approach but there were only four historical releases).


Why was this broken?


It’s good that the Open Live Writer team moved the Google Blogger secrets out of their public repo. However, this makes it difficult for individuals to build a complete version of the app. A good solution could be to use a CI/CD build solution – I wonder if the Microsoft team might look into Visual Studio Team Services? I suspect they could get a good deal from that vendor.


I wrote up the bug in Issue #561.

There is still an issue with using images and Open Live Writer with a Blogger account due to the Picassa shutdown.  I will post again if I find a workaround for that issue.

Wednesday, January 14, 2015

Excel 2013 Conditional Formatting for Columns

If you have two columns in an Excel sheet, and you want to conditionally format fields in the second column when the values are not equal, do this:
image
Our starting point – we want Grape to be highlighted because it is not the same as Cherry.
Select all of column B by clicking the header.  On the Home tab, click Conditional Formatting… New Rule.
Choose “Format only cells that contain”, and “Cell Value” “not equal to” “=A1”.  Note that putting the “=” is very important because otherwise Excel will think you’re comparing it to the string literal “A1”.
image
Then click “Format…” and select the appropriate formatting (such as setting a fill color).
Then click OK and OK.
image
Note: If you don’t want the header to be highlighted, you can apply the conditional formatting to only the cells with actual data, but you will have to adjust the corresponding comparison row in the formula.  In our example, we might apply the conditional formatting to cells B$2$:B$5$ (which starts at row 2), but we’d have to set the formula to “not equal to” “=A2” (also starts at row 2).  If you want to select down to the end of the sheet, your selection formula would be something like =$B$2:$B$1048576 on the Excel 2007+ “big grid”.

Monday, September 8, 2014

New Add-on for SSMS: T-SQL Flex

Do you ever copy query results out of SQL Server Management Studio, paste them into your text editor, and then perform gold-medal find + replace gymnastics to create T-SQL scripts?

Do you ever need to copy a small amount of data from one SQL server to another, but don’t want to set up a linked server or take the time to create an SSIS package?

Do you ever need to create simple Excel sheets from SQL Server queries – preferably one tab per query result and with valid formatting (such as showing dates correctly and not truncating leading zeros)?

Have you ever wanted to quickly script a temp table that has the exact schema (including nullability and precision) of a query, stored procedure, or table-valued function?

If you answered yes to any of the above questions, there is a new add-on available for SQL Server Management Studio that you may like called T-SQL Flex.

TSqlFlexScriptToInserts

T-SQL Flex is a free, open-source add-on for SQL Server Management Studio that does only two things:

  1. It scripts SQL query results to INSERT statements.
  2. It scripts SQL query results to Excel-compatible spreadsheets (specifically, XML Spreadsheet 2003 format).

Because T-SQL Flex does only these two things, it is very easy to use.  Simply paste in your query and click the “Run ‘n’ Rollback” button.  T-SQL Flex will create an ADO.NET transaction, run your query, collect the results, and then roll back the transaction.

You can check out the latest release here:

https://github.com/nycdotnet/TSqlFlex/releases

If you like T-SQL Flex, please let Steve know on Twitter:

https://twitter.com/nycdotnet

Thanks to the team at Red-Gate that created the SIP framework used by T-SQL Flex.

Happy scripting!

Tuesday, July 8, 2014

How to Generate a Fiddler SAZ File

Fiddler is a free program that will log HTTP and HTTPS requests on Windows.  These instructions demonstrate how to use Fiddler to create an archive file (.SAZ) of these requests for troubleshooting purposes using the full version of Fiddler.  As an alternative, there is a simplified version of Fiddler available that only supports capturing here: http://fiddlercap.com.

Warning: Distributing a SAZ file is potentially a massive security risk, especially if HTTPS decryption was enabled during the traffic capture, because any secrets that are sent over the wire (including even passwords or session cookies) will be included in the file.  You can use Fiddler to AES-encrypt the SAZ file using a password via the save dialog, but you must still treat the exported SAZ file (and password) with extreme care!!

  1. If the web site that you need to profile uses HTTPS, please consider getting a dedicated VM set up for installing Fiddler.  This will make trusting the Fiddler certificate (essentially a self-inflicted man-in-the-middle attack) less problematic.  There are instructions on how to do that here if you’re going to be testing with old IE versions.
  2. Go to http://fiddler2.com and download Fiddler.  You can use either the .NET 2 or .NET 4 version depending on which version of the framework you have installed.  Install it accepting the defaults and run it.
  3. Do not perform this step if the site that you need to profile is HTTP-only.  If the site that you need to profile uses HTTPS, open Tools… Fiddler Options… HTTPS tab.  Enable “Decrypt HTTPS traffic”.  When the SCARY TEXT AHEAD dialog comes up, click “Yes” to trust the Fiddler Root certificate, and then click “Yes” again to acknowledge that you want to allow man in the middle attacks on this computer (which is how Fiddler can decrypt your HTTPS traffic (good), and how malicious actors who also have a copy of the Fiddler certificate could too (bad)).  More information is available here: http://docs.telerik.com/fiddler/configure-fiddler/tasks/DecryptHTTPS

    Screenshot of Fiddler Options dialog
  4. If you want to use a browser other than Internet Explorer to generate the SAZ file, you may need to follow additional instructions here: http://docs.telerik.com/fiddler/configure-fiddler/tasks/ConfigureBrowsers 
  5. Minimize Fiddler, and now browse to the site you want to test.  Tab back to Fiddler and you should see the HTTP and HTTPS calls that were made while the capture was running.  For example, here is a visit to the www.google.com homepage.  To see the session details, select the Inspectors tab, and click the “Raw” on both the top and bottom panels – this allows you to see the exact text that was requested from the server by the browser and the browser’s exact response.

    Screenshot of Fiddler showing the left and right hand sides, plus the top and bottom request and response panels.
    In this screenshot, you can see the list of sessions that happened as a result of accessing www.google.com.  When I clicked on a session at random, I was able to see the details on the right-hand pane when I selected Inspectors and then Raw on the top and bottom section.
  6. To export the SAZ file, select the sessions that are interesting in the left-hand pane and click File… Save… Selected Sessions… in ArchiveZip…  Select “Password Protected SAZ” in the “Save as type” field.  “Save the SAZ file in a secure location.  It’s best to exclude things like login pages or other forms with secrets if they’re not relevant to the issue you’re troubleshooting because exported SAZ file will contain any secrets that were transmitted (including HTTPS transmitted items if HTTPS Decryption is enabled).  Choose a strong password.  You will need to share this password with whomever you wish to open the file.
  7. Securely provide the SAZ file and password to whomever needs it.  Again - this file contains EVERYTHING that was sent on the computer via HTTP (and potentially HTTPS) including potentially passwords, session cookies, and other secrets that can be read in clear text if you have the SAZ password.  It is critically important to care for this file and the password in a secure manner!! (Can you tell that this is important?)
  8. When the other party has the SAZ file on their computer, they can open it by opening Fiddler and clicking File… Load Archive…
  9. If you enabled HTTPS traffic decryption, your computer is still at risk until you perform the following two steps:
    1. Disable HTTPS decryption by opening Tools… Fiddler Options… HTTPS tab, and unchecking Decrypt HTTPS traffic.
    2. Also, click the “Remove Interception Certificates” button to delete the Fiddler certificates.

      See: http://stackoverflow.com/questions/16827901/how-do-you-remove-the-root-ca-certificate-that-fiddler-installs 

Thursday, May 22, 2014

Getting Started with the Modern.ie VMs on VirtualBox with IIS Express

Microsoft has made pre-packaged Virtual Machine images available for purposes of testing different versions of IE via the modern.ie web site.  This blog post describes how you can get these VM images loaded into the free VirtualBox software and talking to an IIS Express web site running on your local PC.

Warning: These instructions were tested on VirtualBox 4.3.12, the latest version as of May 22, 2014.  By default, this is set up to make your VM get Internet access via your PC using a virtual NAT.  The VM will be assigned an IP address by a built-in DHCP server that runs on the VirtualBox Host-Only NIC.  Unless you start changing things, this should all remain on your local PC and your VM won’t accidentally get an IP address from your network’s real DHCP server – but your mileage may vary and you should confirm that!  The author of these instructions makes no warranty that these settings may not cause a problem on your particular network, so you should proceed with caution and at your own risk.  Do not follow these instructions if you are not comfortable with the concepts of IP addresses, network cards, virtualization, or web servers – or what havoc a rogue DHCP server could cause.

  1. Download and install Virtual Box: http://www.virtualbox.org (yes I know it’s Oracle, but it is gratis and it works even on some older Core2 processors that Hyper-V doesn’t support)
    • Be sure that Virtual Box is fully installed before starting the next step because installing the drivers will temporarily disable your physical NIC.
  2. Open your Network control panel and ensure that the “VirtualBox Host-Only Network” adapter is set to use the static IP 192.168.56.1 and the Subnet Mask is 255.255.255.0.  You can leave the DNS server blank.
  3. Download the appropriate VM image from the modern.ie web site
    • Open this page: http://modern.ie/en-us/virtualization-tools#downloads
    • Select "VirtualBox on Windows".
    • Download part1.exe and all of the .rar files for the particular VM you want.  Save these to a temporary "downloads" folder.
      ie8-modern-ie
    • When all of the files are downloaded, run the EXE and allow it to extract the .OVA file.  Once you have the .OVA file, you can then delete the corresponding .EXE and .RAR files.
    • Move the .OVA file to a “special place”.  This is the file you have to run to set up a new VM of that variety.
    • Run the .OVA file by double-clicking on it.  You will get an "import" screen in Virtual Box.
      • Change the "Virtual Disk Image" path to point to the appropriate place where you want the virtual hard drive to live for the VM you’re creating.
      • Check the box to reinitialize the MAC addresses.
      • Click “Import”
        image
  4. When the import is complete, go into the settings for the VM.  On the Network tab, confirm that network Adapter 1 is attached to NAT.  Click OK.
  5. Boot the VM by selecting it and clicking the Start button in the button bar.
  6. Note: the login information on all of the modern.ie VMs is IEUser and Passw0rd!
  7. When the VM boots up, open a command line in the VM and run ipconfig /all
    • The first VM you launch should have an IPv4 address like 10.0.2.15 which was served by the virtual DHCP server on 10.0.2.2.
  8. The next step assumes that you already have a working site in IIS Express.  If not, use Visual Studio or some other tool to create one.
  9. In your “Documents” folder on the host PC, open the IISExpress\config\applicationhost.config file.
    • Find the web site that you want to set up for the VM to use and add an extra entry to the bindings tag to allow IIS Express to listen on the internal VirtualBox IP address (in my example, the site was set up on port 59707 – you can use whatever port you wish) and save the config file:
      image
  10. Start the site.
  11. Try to access the site by visiting http://192.168.56.1:59707 (or whatever port number that you used) – it should hopefully work as expected.

Have fun getting your new site working with old IE!

Wednesday, February 27, 2013

Setting up an Internal Friendly URL

Note: This solution is not necessarily the best or most efficient solution in all cases.  It is, however, very simple and works with any site - even ones you have no control over.

Problem:

Internal Web System XYZ must be accessed via an ugly URL such as http://randomservername.internalexample.com:8675309/SomeCrazyPath/SomeFile.htm

Desired End State:

Internal users should be able to type in a friendly URL (such as http://myapp.internalexample.com) and get sent directly to the "homepage" of the desired system.  Search result optimization and using deep links with the friendly URL are not required.

One Solution Using IIS 7.5 (should work with earlier versions by hunting for the same options):

  • Register myapp.internalexample.com and other related host names such as dev-myapp.internalexample.com in your organization's DNS.  If the server where you will be hosting the friendly URL is more likely to change its IP address instead of its name, use a CNAME record; if the server is more likely to change its name but keep its IP address, use an A record.
  • Open your IIS Manager and right-click Sites... Add Web Site.
    • The site name should be "myapp.internalexample.com (redirect)".
    • The physical path should be a folder in a secure location local to the web server.  (whatever is appropriate for your environment - it will only require a few KB of storage).
    • Set the host name to "myapp.internalexample.com" .
    • Hit OK.  This should create the site and start it automatically.
  • Go to the "HTTP Redirect" HTTP Redirect Screenshot option under the IIS section for the new site, and check the box for "Redirect requests to this destination".
    • Set the destination to your application's "real" full URL including the protocol (http or https), port numbers, deep path, document, query string, etc.
    • Check the box for "Redirect all requests to exact destination (instead of relative to destination), but do not check the box for "Only redirect requests to content in this directory (not subdirectories)".
    • The default status code "Found (302)" is fine.
    • Click the crazy Apply button in the far upper right.  Apply Screenshot
  • Next, open the "HTTP Response Headers" option HTTP Response Headers Screenshot 
    • Click the small "Set Common Headers..." button in the actions bar (upper right).
    • You can uncheck "Enable HTTP keep-alive" and set the box to expire web content "Immediately".
    • Click OK.

Set Common HTTP Response Headers dialog

  • Clients should now get redirected to the main site by visiting the friendly URL.  Because the HTTP header indicates that the content expires immediately, the IIS server hosting the friendly URL will be hit every time.  Since the only response is an HTTP redirect enforced by IIS (< 500 bytes), the load should be very light except in the most extreme circumstances, and this gives you the ability to easily change the redirect URL at some point and have the change take effect immediately.
  • If you want to include content in the root folder for the web site to make the intention clear to a server admin browsing to this folder, you can create a default.htm file with the following content:

    <!DOCTYPE>
    <html>
    <!-- Note: This site is redirected via IIS Settings.  This  page should actually never be seen or used. -->
    <head><meta http-equiv="Refresh" content="0;url=
    http://myapp.internalexample.com" /></head>
    <body><a href="
    http://myapp.internalexample.com">Click here to continue to the site.</a></body>
    </html>

Please note, though, that this extra step is absolutely not required, though, since the IIS server should be ignoring all site content due to the HTTP Redirect setting.  It could also "get stale" in case the redirection URL is updated in IIS but not in the HTML file which could cause more confusion.


Raw Request to http://dev-mysite.mydomain.com (captured with Fiddler):

Fiddler capture text (Request)

Raw Response from IIS (captured with Fiddler):

image

Wednesday, February 6, 2013

Using SkyDrive at Work for Collaboration - A Quick Start Guide

It seems that many of my projects in the past year or so have required sharing files with external business partners.  I've found that SkyDrive has been quite useful for this purpose.  Here's how to get started quickly and securely sharing files.

Setting up SkyDrive sync:

1. If you don't yet have a Microsoft account, go ahead and sign up using your normal work email address - you don't need a Hotmail account or any Microsoft-specific domain name as your Microsoft user ID anymore.  Use a strong password, or better yet use a password solution like LastPass.

2. Download the SkyDrive application for your system (Windows 7 client is 5.7 MB as of Feb 2013).  This step isn't strictly needed, but it does make the integration much more seamless.

image

3. When the setup finishes, a wizard will ask you to make some unimportant choices and then one very important choice.  One of the items in setup that I personally turn off is the ability to remotely retrieve files on my work PC via the SkyDrive web user interface.  You may find this feature useful, but I've decided that it does not make sense for my scenario.

4. Once the client is installed, you should have a SkyDrive folder in your user profile folder that is set up for synchronization.

image

5. In this folder, create a folder called "Work Collaboration".  This is where you will be making subfolders for projects that you'll be sharing with different sets of people.

When you create a new folder, it will show up with the blue circular arrows indicating that it is syncing with Skydrive...

image

... and after a few seconds, it should show up with a green checkbox indicating that it has synchronized with the cloud.

image

You are now ready to share files.

Here's how sharing works:

So, you need to share a file with a business partner?  Usually, you'd launch your mail client, type an email saying "here is the sales analysis spreadsheet you wanted to look at" and begin to attach the file. However, you know this spreadsheet is going to go back and forth at least a few times with edits. That's a lot of email! Here's the better way.

1. Create a new folder in your Work Collaboration folder called (for example) "Sales Analysis" or whatever makes sense for the project.

image

2. Copy the file there using Windows Explorer. This will automatically kick off the process of synchronizing it.

image image

3. Go back up one level (backspace key in Windows Explorer), right click on the folder you're going to share and click "SkyDrive... Share".

image

4. This will open your browser and log you in to SkyDrive.  You will be presented with the option to "Send email".  Send the email to the work address of your contact(s).  You should always check the box that says "Require everyone who accesses this to sign in" if you care about keeping the files secure.  You can also indicate if the recipients of the email can edit files in the folder (if unchecked, they will have read-only access).

image

Once you click Share, the list of users with granted permissions will display. You can click Done to exit.


What happens on the sharing partner's computer?

1. Your partner will get an email with content like this:

image

2. If they are not registered, they will be able to click the link "Sign Up now" on the SkyDrive login page.  You need to tell them to use their work email address to sign up for a Microsoft account.

image

3. Once they're logged in, they will see the folder and can work with the shared documents using the SkyDrive web site.  Any edits or new files uploaded to the folder will be automatically synchronized to your PC when changes are made to a shared folder in your SkyDrive.  If the documents are in one of the MS Office file formats, you or your sharing partners can even use the built-in web-based Office apps to view the documents or make edits.

image

4. If one of your business partners ever wants to get back to the place on SkyDrive that you've shared, they can just log in to their SkyDrive account and click "Shared" on the left-hand pane and your SkyDrive will be listed.

image

When I'm done sharing

When you're ready to stop sharing a file or folder, open it using the SkyDrive... Share option on the right-click menu, or if you are on the SkyDrive site already, use the "Sharing" link at the top.

image

On the left-hand pane, select the individuals you want to remove permissions for, and click "Remove Permissions".  They will no longer be able to access the selected items on your SkyDrive.


I hope you find SkyDrive as convenient and painless as I have.  If you have any questions about SkyDrive, please ask!  I'm a member of the SkyDrive Insiders program; you can learn more about this program here.

Saturday, November 24, 2012

IIS Express Quickie Command-line

This is a reminder to my future self for how to quickly start IIS Express from the command-line on 64-bit Windows 7 or 8 assuming you already have IIS Express installed using the defaults.

  1. Open admin command line.
  2. cd\Program Files (x86)\IIS Express
  3. iisexpress /path:c:\YourApplicationRootFolder /port:WhateverPortNumber

Note: You can also specify /clr:v2.0 if you hate fun.  The default is CLR 4 which works with .NET 4 and 4.5.

This was adapted from the full article on www.iis.net: http://www.iis.net/learn/extensions/using-iis-express/running-iis-express-from-the-command-line

Monday, October 1, 2012

SQL in the City - New York 2012

I was able to attend the SQL in the City event in New York this past Friday.  I highly recommend that anyone who can spare the time and travel should attend the next SQL in the City day in your area.  I found it to be a very well put-together event with useful content and excellent networking opportunities.

At the event I was able to meet both Steve Jones (who compassionately shook my hand as I walked in dripping wet from the rain during my walk over to 3rd Avenue) and Grant Fritchey (Scary DBA).  It was great to have even a brief conversation with each of them and introduce myself.  I also got to meet Product Manager David Atkinson and Developer David Simner and talk briefly about the awesome SQL Source Control and SQL Compare products.  The presentations I attended, "Database Maintenance Essentials", "Red Gate Tools - the Complete Lifecycle", and "The Whys and Hows of Database Continuous Integration" were all very informative and useful.

The highlight of the day was finding out about Red-Gate's Virtual Restore product.  This tool essentially allows you to mount a .BAK file as a database.  It supports multiple databases mounted from the same .BAK file, and it is not destructive to the .BAK file.  From the description, it works very similarly to VMs that are mounted from a disk file and then store changes in a disk "diff" file.  This tool allows you to save both space and time and sounds very awesome for developers.

I must say that I think Red-Gate has made a critical error with the marketing of this tool.  Developers hear "restore" and think "DBA tool"; in fact I think that's what the Red-Gate marketing team thought too as this application is included in their DBA bundle only.  I would absolutely use this tool as a developer and I might even use it as often as I use things like SQL Compare and the rest of the more developer-oriented tools.  It's a game-changer, and I hope Red-Gate figures out that they're doing a very bad job of marketing this product and could probably be making a lot more money from it by just getting the word out that it's not only a DBA tool.  For most of the other Red-Gate developer tools, a savvy developer could imagine cooking-up some sort of "good enough" workaround to not have to buy it (though certainly not in a shorter time than the reasonable expense for the license), but I would never even attempt creating something like Virtual Restore.  I will absolutely be trying out this software later this week.  Red-Gate - you've got to get the word out, even think about changing the name or something!!!

Thanks very much to everyone at Red-Gate for putting this event together.  I hope to see you again at the next SQL in the City.

Tuesday, August 14, 2012

Fix: Crystal Reports Shows Red X Across Entire Page When Report Run Inside Visual Studio

I was googling (with Bing AND Google) like crazy for a solution to this, but didn't find one from any of the open resource sites, so I figured I'd blog about my fix for this to help the next poor dev to come along.

I was getting user feedback that one of the Crystal Reports in an application that I support was intermittently crashing.  When I ran the report in Visual Studio, on certain pages of the report, I observed a red X across the whole screen with a white field.  Obviously something was very wrong here!!!

Red X on Crystal Report 

It boiled down to that there was a null value being used in one of my formula fields, and Crystal seems to raise an exception for nulls when they are used as part of certain types of formulas and not converted manually to an actual value first.  I didn't know which field was causing the issue so I just started a divide and conquer approach.  I suppressed all fields and confirmed that the report worked (select a bunch of fields, Right Click... Format Multiple Objects... Suppress).  Then I started un-suppressing a few objects at a time until the report started failing again.  Now I knew where the problem was (or at least one of the problems).

I then right-clicked one of the formula fields and chose "Find In Formulas" to open the formula workshop.  I drilled down to the formula field (it could be in any of the sections) and found the offending one.  Note that it could be a "normal" formula field or even one of the special formatting formulas (like "if this field's value is true, format as green").

image

I believe the "right way" to fix it is to handle NULLs properly using ISNULL() (which returns a boolean unlike the T-SQL ISNULL() ) or another appropriate method in Crystal for each and every one of your formulas.  This MSDN article describes that.  However, there exists another workaround as well which should be fine for most simple cases.  On the top of each formula when you click into the white field where the code actually lives, you can change this box:

Exceptions For Nulls

To say this:

Default Values for Nulls

If you choose "Default Values For Nulls", Crystal will substitute "" for null strings and an appropriate flavor of 0 for numeric fields.  Here's some documentation that oddly seems to skip booleans.

This dropdown selection is per-formula, so it might take a lot of work to go through and change every formula in the tree view (don't forget to look at the formatting formulas too!!!), but if your report is crashing with the dreaded red X and you don't know why, this may get it working again.

Wednesday, July 18, 2012

Enabling "Open Project Folder" for project types that don't support it

One annoying thing about SSIS (2008) and some of the other project types in Visual Studio is the lack of an "Open Project Directory..." option on the project right-click menu.  Visual Studio's "Tools" menu can provide a work-around this.
 
Go to Tools... External Tools... and add a new entry with the following properties:
Title = &Open Project Folder
Command = explorer.exe
Arguments = "$(ProjectDir)"
Initial Directory = "$(ProjectDir)"

image


Now, when I select my SSIS project, I can choose "Tools... Open Project Folder" (or ALT+T,O,<ENTER>), and the correct folder will open in Windows Explorer.
 
Using macros such as $(ProjectDir), $(SolutionDir), $(Configuration), and others can come in very handy when you find yourself doing the same types of things over and over in Visual Studio.  Here is the documentation for all other built-in VS macros:  http://msdn.microsoft.com/en-us/library/c02as0cs.aspx

Sunday, July 8, 2012

A Pattern for PIVOT

Use of the PIVOT operator in T-SQL has always been tantalizing yet confounding to me.  It offers the promise of more concise and expressive code compared to a subselect pattern, yet I've always found it difficult to get the code just right so that I could apply it in a consistent way without my queries feeling like they are "working by miracle" or that there is way too much hardcoding going on resulting in my code becoming rigid or brittle.

I believe that I've finally figured out a good pattern for using PIVOT that is fast, concise, and reusable.   The pattern hinges on these points.

  1. Only apply this pattern to datasets when you know how many categories you will end up with; for example, months/quarters in a year.  If you don't know this at design time, it might be best to just return the raw data and let your presentation layer do the Pivot (assuming some reporting solution or app).  Barring this, you're off into the land of dynamic SQL (bring a towel).
  2. Start with a CTE called "categoriesAndRawData".  This represents your categories and the raw data to pivot.  Included should be three aliased fields, [PivotOn], [PivotAggregate], and [PivotAnchor].
    • The [PivotOn] field is the value that will turn into the column names or categories.  You should try to keep this as simple as possible - best is a number, but a short code will also work.
    • The [PivotAggregate] field represents a number that will be summed in the pivot result.  If you are looking to do a count, you can hardcode a 1 for this field.
    • The [PivotAnchor] field provides a point of reference for the Pivot On field.  If you were PIVOTing out months into columns, this would be the year.  This field is optional if you don't need an anchor such as if you were PIVOTing data into one of N categories and the categories don't need context.
  3. Create a minimalist subselect from the categoriesAndRawData CTE that includes only the Anchor, Aggregate, and PivotOn fields, plus any "keys to carry through" (the "keys to carry through" is the magic sauce of this pattern).  Alias this as pIn - "pivot input".
  4. Add a PIVOT clause with a SUM of the pIn.PivotAggregate using the pIn.PivotOn field, and then list out your categories in the IN clause.  Alias the pivot result as "pr".

Examples

I have setup the following example queries from the AdventureWorks2008R2 database.

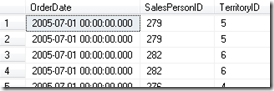
I have the following query that provides the raw data needed to find all-time sales by month overall, by sales person, and by territory.  (Note this only includes data where the sales person is known - there are many rows in AdventureWorks2008R2 where the sales person is NULL).

SELECT OrderDate, SalesPersonID, TerritoryID FROM Sales.SalesOrderHeader

  WHERE SalesPersonID IS NOT NULL AND TerritoryID IS NOT NULL;
image

Let's follow the pattern.

Step 1: I know that I want to break out this data into months per year so I know the number of categories (12 months) and my anchor element that describes the categories (the year).  So I have confirmed that my dataset fits this pattern.  Step 1 = Check.

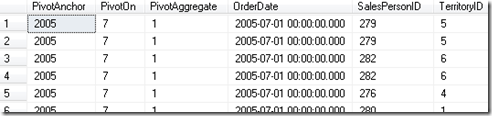
Step 2: Let's get my query ready that will be used as the categoriesAndRawData CTE...


SELECT YEAR(OrderDate) AS [PivotAnchor],

      MONTH(OrderDate) AS [PivotOn],

      1 AS [PivotAggregate],

      OrderDate, SalesPersonID, TerritoryID FROM Sales.SalesOrderHeader

      WHERE SalesPersonID IS NOT NULL AND TerritoryID IS NOT NULL;
 

image

This is the same query as the raw data except that it has the three fields needed to do the PIVOT.  The PivotOn field which will become my columns in the pivot result, the PivotAggregate which will be SUMmed to become the data in the pivot result, and the PivotAnchor which provides context for the PivotOn field.  Because I am going for a "COUNT" of sales in my results, I can hardcode a 1 as the PivotAggregate.  If I were interested in dollars of the sales, I could put either the SubTotal or TotalDue field here.

I can change this into a Common Table Expression (CTE) by stating it as this:

WITH categoriesAndRawData AS (

    SELECT YEAR(OrderDate) AS [PivotAnchor],

      MONTH(OrderDate) AS [PivotOn],

      1 AS [PivotAggregate],

      OrderDate, SalesPersonID, TerritoryID FROM Sales.SalesOrderHeader

      WHERE SalesPersonID IS NOT NULL AND TerritoryID IS NOT NULL

    )

  SELECT * FROM categoriesAndRawData;

This is the same query as before, except encapsulated as a CTE called categoriesAndRawData.  If you are not familiar with Common Table Expressions, for the purpose of this discussion you can think of it like a named "temporary view".  I now have my CTE and the [PivotOn], [PivotAggregate], and [PivotAnchor] fields.  Step 2= Check.

Step 3: now I have to write a select statement that "includes only the Anchor, Aggregate, and PivotOn fields, plus any "keys to carry through"".  For my first pivot I only want the count of sales by sales person, so here is that query:

WITH categoriesAndRawData AS (

    SELECT YEAR(OrderDate) AS [PivotAnchor],

      MONTH(OrderDate) AS [PivotOn],

      1 AS [PivotAggregate],

      OrderDate, SalesPersonID, TerritoryID FROM Sales.SalesOrderHeader

      WHERE SalesPersonID IS NOT NULL AND TerritoryID IS NOT NULL

    )

  SELECT PivotAnchor, PivotAggregate, PivotOn, SalesPersonID FROM categoriesAndRawData;

(We will apply the pIn alias to this when we convert it to a subselect in Step 4).

Since for this first query I don't care about the territory, I can exclude it from the query and I can just include the Anchor, Aggregate, "On", and the keys to carry through.  Step 3 = Check.

Step 4: Now I have to wrap my bottom query from Step 3 in parentheses, and alias it  AS pIn.  Then I need to add a PIVOT operator after this, put an open parenthesis, and then put the text SUM(pIn.PivotAggregate) FOR pIn.PivotOn   .  Then I put a space and add an IN clause with my categories, and close out the pivot with a close parenthesis and the pr alias.  For this query, since I am breaking out the data into month categories, that second part looks like this: IN ([1],[2],[3],[4],[5],[6],[7],[8],[9],[10],[11],[12])) pr

The whole "Pivot" section including the original CTE, the minimalist query wrapped in parentheses and aliased as pIn, plus my PIVOT clause looks like this (though this query won't yet run):

  WITH categoriesAndRawData AS (

    SELECT YEAR(OrderDate) AS [PivotAnchor],

      MONTH(OrderDate) AS [PivotOn],

      1 AS [PivotAggregate],

      OrderDate, SalesPersonID, TerritoryID FROM Sales.SalesOrderHeader

      WHERE SalesPersonID IS NOT NULL AND TerritoryID IS NOT NULL

    )

  --ToDo: Fill in this part...

  (SELECT PivotAnchor, PivotAggregate, PivotOn, SalesPersonID FROM categoriesAndRawData) AS pIn

    PIVOT (SUM(pIn.PivotAggregate) FOR pIn.PivotOn

      IN ([1],[2],[3],[4],[5],[6],[7],[8],[9],[10],[11],[12])) pr;
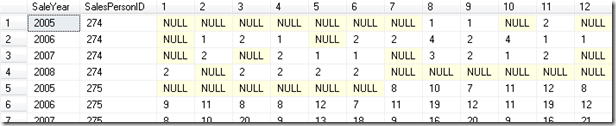
Now all I have to do is fill in the part above the pIn subquery.  I can insert the following text above the subquery (replacing the ToDo comment above):

  SELECT pr.PivotAnchor AS [SaleYear],

      pr.SalesPersonID,

      [1],[2],[3],[4],[5],[6],[7],[8],[9],[10],[11],[12]

Which gives me this as the final query:

WITH categoriesAndRawData AS (

    SELECT YEAR(OrderDate) AS [PivotAnchor],

      MONTH(OrderDate) AS [PivotOn],

      1 AS [PivotAggregate],

      OrderDate, SalesPersonID, TerritoryID FROM Sales.SalesOrderHeader

      WHERE SalesPersonID IS NOT NULL AND TerritoryID IS NOT NULL

    )

  SELECT pr.PivotAnchor AS [SaleYear],

      pr.SalesPersonID,

      [1],[2],[3],[4],[5],[6],[7],[8],[9],[10],[11],[12]

    FROM (SELECT PivotAnchor, PivotAggregate, PivotOn, SalesPersonID FROM categoriesAndRawData) AS pIn

    PIVOT (SUM(pIn.PivotAggregate) FOR pIn.PivotOn

      IN ([1],[2],[3],[4],[5],[6],[7],[8],[9],[10],[11],[12])) pr;

image

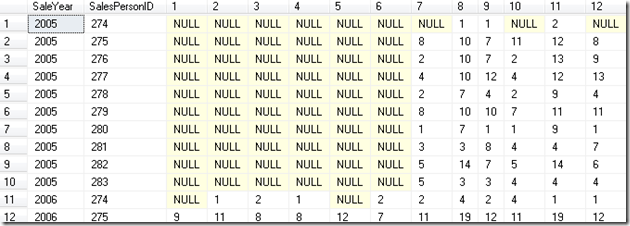
Hooray - pivoted data.  I can add an ORDER BY at the bottom if I want to for example consolidate my years together and then show each sales person for that year.

WITH categoriesAndRawData AS (

    SELECT YEAR(OrderDate) AS [PivotAnchor],

      MONTH(OrderDate) AS [PivotOn],

      1 AS [PivotAggregate],

      OrderDate, SalesPersonID, TerritoryID FROM Sales.SalesOrderHeader

      WHERE SalesPersonID IS NOT NULL AND TerritoryID IS NOT NULL

    )

  SELECT pr.PivotAnchor AS [SaleYear],

      pr.SalesPersonID,

      [1],[2],[3],[4],[5],[6],[7],[8],[9],[10],[11],[12]

    FROM (SELECT PivotAnchor, PivotAggregate, PivotOn, SalesPersonID FROM categoriesAndRawData) AS pIn

    PIVOT (SUM(pIn.PivotAggregate) FOR pIn.PivotOn

      IN ([1],[2],[3],[4],[5],[6],[7],[8],[9],[10],[11],[12])) pr

    ORDER BY pr.PivotAnchor, pr.SalesPersonID ASC;
image

From this screenshot, we can see that the sales data in AdventureWorks2008R2 starts in July 2005.

So what's so good about PIVOT and the use of this pattern?  I could have achieved this by doing normal groups and aggregate functions - true, but this query is now quite flexible.  For example, if I now want to change the query to group everything by territory, I can just change it to the following (different code is underlined and in red):

WITH categoriesAndRawData AS (

    SELECT YEAR(OrderDate) AS [PivotAnchor],

      MONTH(OrderDate) AS [PivotOn],

      1 AS [PivotAggregate],

      OrderDate, SalesPersonID, TerritoryID FROM Sales.SalesOrderHeader

      WHERE SalesPersonID IS NOT NULL AND TerritoryID IS NOT NULL

    )

  SELECT pr.PivotAnchor AS [SaleYear],

      pr.TerritoryID,

      [1],[2],[3],[4],[5],[6],[7],[8],[9],[10],[11],[12]

    FROM (SELECT PivotAnchor, PivotAggregate, PivotOn, TerritoryID FROM categoriesAndRawData) AS pIn

    PIVOT (SUM(pIn.PivotAggregate) FOR pIn.PivotOn

      IN ([1],[2],[3],[4],[5],[6],[7],[8],[9],[10],[11],[12])) pr

    ORDER BY pr.PivotAnchor, pr.TerritoryID ASC;
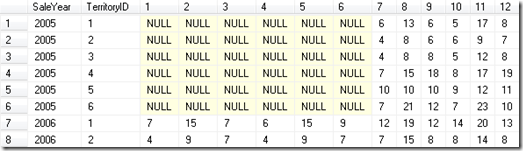
image

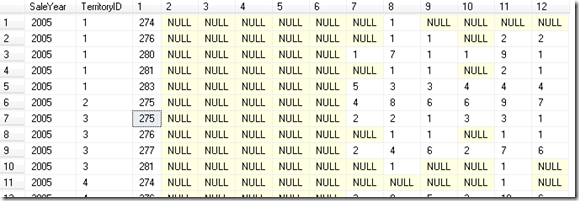
If I wanted to group by territory and sales person ID, I could do that too:

WITH categoriesAndRawData AS (

    SELECT YEAR(OrderDate) AS [PivotAnchor],

      MONTH(OrderDate) AS [PivotOn],

      1 AS [PivotAggregate],

      OrderDate, SalesPersonID, TerritoryID FROM Sales.SalesOrderHeader

      WHERE SalesPersonID IS NOT NULL AND TerritoryID IS NOT NULL

    )

  SELECT pr.PivotAnchor AS [SaleYear],

      pr.TerritoryID, pr.SalesPersonID

      [1],[2],[3],[4],[5],[6],[7],[8],[9],[10],[11],[12]

    FROM (SELECT PivotAnchor, PivotAggregate, PivotOn, TerritoryID, SalesPersonID FROM categoriesAndRawData) AS pIn

    PIVOT (SUM(pIn.PivotAggregate) FOR pIn.PivotOn

      IN ([1],[2],[3],[4],[5],[6],[7],[8],[9],[10],[11],[12])) pr

    ORDER BY pr.PivotAnchor, pr.TerritoryID, pr.SalesPersonID ASC;
image

From this screenshot we can see that sales person 275 made sales in both territory 2 and 3 in 2005.

Lastly, following this pattern makes it easy to retrieve your text descriptions.  Just be sure to remember to do this after the fact - PIVOT is very fast when it's dealing with a minimalist data set, but it can get bogged down quickly when more columns are included in your pIn subselect*.  Remember the guiding principle of step 3 and include "only the Anchor, Aggregate, and PivotOn fields, plus any "keys to carry through" ".  So we just join in the people and territory info at the end using standard techniques for joining tables with foreign key relationships.  This is done outside the pivot - meaning we join to the results of the pivot not categoriesAndRawData or pIn.

WITH categoriesAndRawData AS (

    SELECT YEAR(OrderDate) AS [PivotAnchor],

      MONTH(OrderDate) AS [PivotOn],

      1 AS [PivotAggregate],

      OrderDate, SalesPersonID, TerritoryID FROM Sales.SalesOrderHeader

      WHERE SalesPersonID IS NOT NULL AND TerritoryID IS NOT NULL

    )

  SELECT pr.PivotAnchor AS [SaleYear],

      pr.TerritoryID, pr.SalesPersonID,

         p.FirstName, p.LastName, st.Name AS [TerritoryName],

      [1],[2],[3],[4],[5],[6],[7],[8],[9],[10],[11],[12]

    FROM (SELECT PivotAnchor, PivotAggregate, PivotOn, TerritoryID, SalesPersonID FROM categoriesAndRawData) AS pIn

    PIVOT (SUM(pIn.PivotAggregate) FOR pIn.PivotOn

      IN ([1],[2],[3],[4],[5],[6],[7],[8],[9],[10],[11],[12])) pr

       INNER JOIN Person.Person p ON p.BusinessEntityID = pr.SalesPersonID

       INNER JOIN Sales.SalesTerritory st ON st.TerritoryID = pr.TerritoryID

    ORDER BY pr.PivotAnchor, st.Name, p.LastName, p.FirstName ASC;


image 


I have purposefully been very prescriptive with naming in this pattern.  You can feel free to name the things whatever you want, but this is what I have found works well for me to use the various layers of the PIVOT without having to rethink "what the heck does this represent again?".  The only fields you actually have to use in your main query (the ones in the pivoted result set) are aliased with "pr." which is fairly quick to type/easy to remember.

*Edit July 9, 2012: fixed this to pIn - it has previously incorrectly said categoriesAndRawData.